
Android UI testing in Allegro Pay organization
Will automatic UI tests be able to replace manual testers as artificial intelligence will try to replace programmers? I’ll show you how we write automatic UI tests on Android in Allegro Pay.
The Introduction #
Tests are designed to check whether the user interface is working properly. For example they verify if users see an appropriate screen with correct data and don’t encounter an unexpected behavior. These tests, apart from checking the correctness of displayed screen, should also check whether the user sees the appropriate screen after clicking a button. They allow to check the business process in a controlled manner. At Allegro Pay, we have several critical processes, such as onboarding a new customer or repayment of liabilities. Until now, these processes have been tested manually. Automating these tests allows us to save the tester’s time and eliminates possible human errors.
The Application Class #
You can have your tests running the whole application
or go for partial coverage only. In our case, they run only single module, namely Allegro Pay. This solution
is associated with certain changes that needed to be made. The AllegroPayTestApplication class has been created
inheriting from the TestApplication class. It contains dependencies needed to run our module as a separate
application. Apart from this class, you need to prepare a manifest so that it has references to all activities
available in our module.
class AllegroPayTestApplication : TestApplication() {

   override fun onCreate() {
       super.onCreate()
       initKoin()
   }

   private fun initKoin() {
       loadKoinModules(
           loadNeededModulesHere
       )
   }
}
The Tool, Framework And Pattern #
Tools and frameworks used in the process of adding tests are Espresso and Wiremock Stubbing
and the PageObject pattern.

Wiremock #
Wiremock is a tool which allows mocking the response for a given endpoint with a declared data example. In addition, it can also record requests, map responses, edit response data, and act as a transparent proxy. This solution supports testing of edge cases and different response statuses that are difficult or impossible to automatically simulate in a real test environment. Another big reason for using this tool is stability. Since the test environment to which these tests need to connect doesn’t always work, running the test would not bring any benefits. This would be wasting resources and generating costs. Thanks to Wiremock, it is possible to obtain the same answer each time. Here is an example stub:
open class Stub(val mappingBuilder: MappingBuilder)

internal object GreetingStub : Stub(
   get(
       urlEqualTo("/allegropay/greeting")
   ).willReturn(
       aResponse()
           .withStatus(200)
           .withBody(GREETING_STUB)
   )
)

// <editor-fold defaultstate=collapsed desc="GreetingStub">

@Language("json")
val GREETING_STUB = """
 {
   "greeting": "hello"
 }
"""

// </editor-fold>
The above code shows a stub, that allows any query to /allegropay/greeting to respond with a status
of 200 and data entered in the GREETING_STUB field.
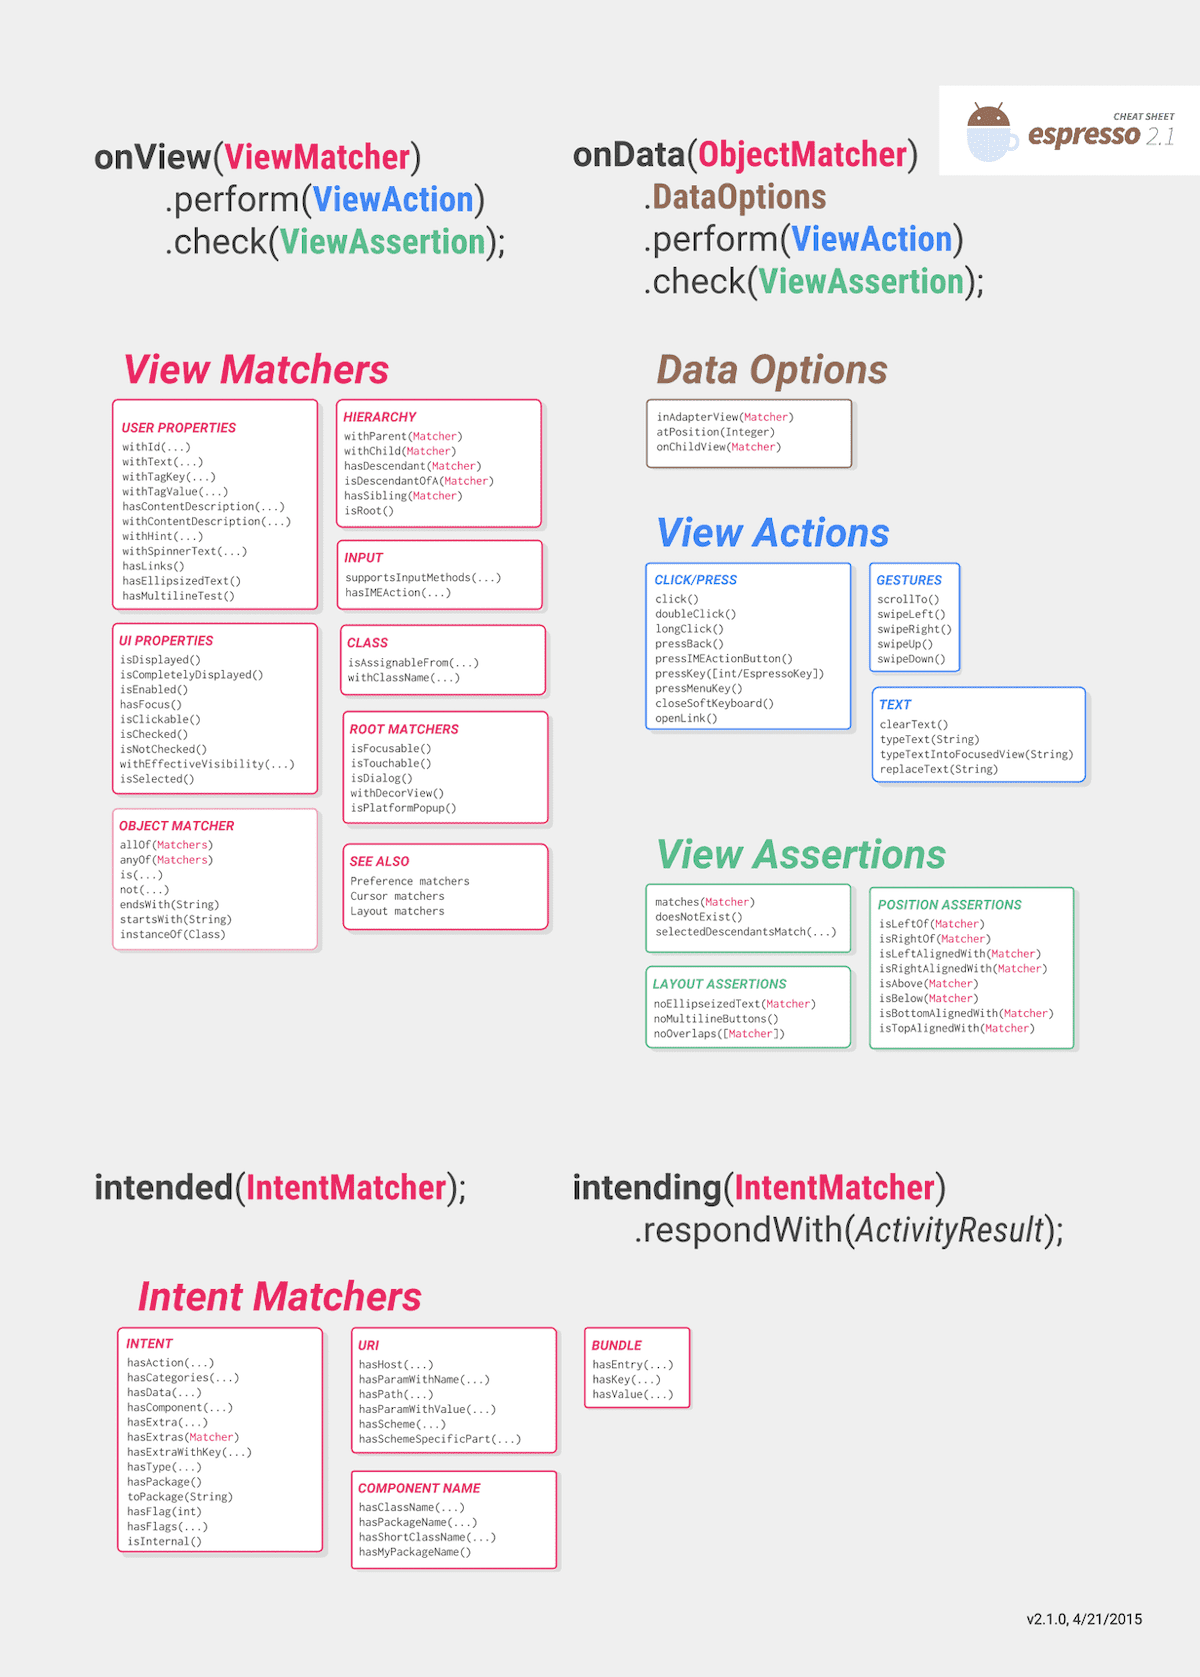
Espresso #
Another tool which I would like to present is Espresso.
It allows describing what we want to test in our activity. You can simulate the operation of the application as
if it was used by the customer. This tool provides several simple methods for ensuring the interaction and
assertion of the view state. I put a cheat sheet with the most needed and most used matchers, actions,
assertions, etc. below. Espresso provides management of the main thread, what significantly speeds up and
facilitates writing tests. An important consideration when using this tool is that system animations and
“don’t keep activities” function cannot be enabled on the test device.
PageObject Pattern #
The last thing needed to write perfect tests is the PageObject pattern which allows you to store the interactions and assertions in one place in the context of each screen. According to Martin Fowler (if you haven’t read his books, you should!):
The basic rule of thumb for a page object is that it should allow a software client to do anything and see anything that a human can.
The test #
Below is one of the tests written for the Dashboard screen:
@Test
@Stubs(
   Stub1::class,
   Stub2::class,
   Stub3::class,
   Stub4::class,
   Stub5::class
)
fun testUserCanSeeDashboardThenSettingsThenOverpaymentThenGoBackToDashboard() = launchDashboardActivity {
   inDashboard()
       .toolbarPage { toolbar ->
           toolbar.checkName(DASHBOARD_TOOLBAR_NAME_RES_ID)
               .dashboardMenuItemPage { menuItem ->
                   menuItem.tapOnOptionsButton()
               }
       }

   inSettings()
       .toolbarPage { toolbar ->
           toolbar.checkName(SETTINGS_TOOLBAR_NAME_RES_ID)
       }.overpaymentItemPage(position = 1) { item ->
           item.tapOnOverpayment()
       }

   inOverpayment(parseOverpaymentData(OVERPAYMENT_WITHOUT_IBAN_POSITIVE))
       .toolbarPage { toolbar ->
           toolbar.checkName(OVERPAYMENT_TOOLBAR_NAME_RES_ID)
               .tapToolbarBack()
       }

   inSettings()
       .toolbarPage { toolbar ->
           toolbar.checkName(SETTINGS_TOOLBAR_NAME_RES_ID)
               .tapToolbarBack()
       }

   inDashboard()
       .toolbarPage { toolbar ->
           toolbar.checkName(DASHBOARD_TOOLBAR_NAME_RES_ID)
       }
}
The above test allows you to check the path followed by the user who wants to see the overpayment screen
from the dashboard and then return. Methods with the in prefix contain a page object that provides the
necessary interactions and assertions to check the view. By running this test on the test device, you can
see the start of the application with the dashboard screen, where the title of the toolbar is checked
and the button that takes you to the options screen is clicked. In the options screen, the title of
the toolbar is checked and you click on the option that takes you to the overpayment screen.
The toolbar title also is checked in the overpayment screen and the back arrow is clicked. The
application returns to the options screen, the title of the toolbar is checked and the back arrow
is clicked. The last screen that is checked is the dashboard screen. And then the test
passes.
The class fragment presented below has the method that was used in the previous test. This method allows
to create settings page object and run check on toolbar page and overpayment item page. Toolbar page object
lets us check name by string resource defined in strings.xml file. Whereas overpaymentItemPage() method
searches for item on the first position on the recycler view. After that it clicks on overpayment option on screen.
This means that the methods can be used for other tests without unnecessarily duplicating it.
inSettings()
   .toolbarPage { toolbar ->
       toolbar.checkName(SETTINGS_TOOLBAR_NAME_RES_ID)
   }.overpaymentItemPage(position = 1) { item ->
       item.tapOnOverpayment()
   }
The Future #
Our test team proposed to provide test scenarios that should be implemented in addition to the so-called
happy paths. These were be the most frequently reported problems by our customers regarding the display
of data or switching between screens. However, it should also be noted that the number of these tests
shouldn’t be too large, because running one test usually takes a few seconds, what may cause queues in the
test environment. Additionally, the tests need to be merged into the main branch. The 10 sample tests took
almost 30 seconds to complete, but the entire procedure took almost a minute.

The End #
We expect that the addition of tests will reduce the work of manual testers. Testing cases that require simulating a specific, very rare behavior or response from the backend takes the longest time. Reducing it by any value is a profit. Happy paths and paths with standard errors can be easily programmed in tests. Additionally, programmers at an earlier stage are able to catch and correct errors resulting from regression. We are already working on adding tests to further processes such as onboarding a new customer, consolidation or repayment. We will also extend our test scenarios with additional cases. And the question posed at the very beginning of this article is still open.