
Acceptance testing with JBehave and Gradle
Typically, applications we develop gain more and more features in each sprint. After a certain time it’s hard to say how a particular functionality should work. No one remembers all the corner cases without looking into the source code. So we write high level acceptance tests that describe expected behavior. Using some example scenarios that the end user could trigger, tests check that the outcome is correct. After the user story is implemented, the test joins a regression suite that will protect the application from bugs introduced in future stories.
Problems with specifying requirements in source code #
We always hear that acceptance tests should be the living documentation for our projects. They should clearly describe what the outcomes for given inputs are. But when we describe requirements in a programming language then the living documentation concept often becomes just a theory. Some languages and testing tools have nice syntactic sugar that simplifies reading, such as Groovy with its ability to use spaces to separate words in method names or Spock with predefined given/when/then blocks. But test specification written in a programming language is always cluttered with its keywords, import statements, indentation, setup blocks and so on. We could also use Steve Freeman’s and Nat Pryce’s technique presented in “Growing Object-Oriented Software Guided by Tests”. These tests hide complexity in wrapper classes that simulate invocations of application API and external conditions. But it’s still source code. If you need a clean specification of application behavior, readable by non-technical folks, then you need something better than source code.
Why JBehave? #
There are many tools supporting acceptance testing, including some for Java, such as JBehave, Cucumber JVM, Concordion and others. You can easily find some articles comparing them. In this article we will use JBehave. Here are its advantages:
- well documented,
- it uses Java and JUnit, you can run acceptance test from an IDE like other unit tests,
- very clear specification in text files, you only need a text editor to read them,
- uses BDD approach with given/when/then blocks,
- it’s fast, just a thin wrapper around JUnit,
- highly configurable,
- generates nice reports in HTML or TXT formats,
- mature and feature rich,
- very popular.
Example project #
As a reference for this tutorial we will use a simple implementation of Pricing Service which will tell us how much we must pay when we list an offer in allegro.pl. Complete source code is available on GitHub. Total price depends on selected promo options such as bold text in offer title. Prices also differ in different categories like computers, fashion, sport, etc. In the background, Pricing Service maintains several price lists. One of them is default and contains price for all promo options. There could be also additional price lists for specific categories that override default prices.
First test #
At first we need to configure JBehave. There are several ways to do this. We extend
JUnitStory class and use
Configuration
and Embedder, as it gives
more options than using annotations. Other ways of configuration are listed in the
documentation. We create an abstract class AcceptanceTest
that serves as a base class for all specific tests. This will ensure all of them use the same configuration. If any
test needs a different configuration for some reason, supply different values by overriding methods from the base class.
AcceptanceTest.java
public abstract class AcceptanceTest extends JUnitStory {

  public AcceptanceTest() {
    Embedder embedder = configuredEmbedder();
    embedder.embedderControls()
            .doVerboseFailures(true)
            .useStoryTimeoutInSecs(60);
  }

  @Override
  public Configuration configuration() {
    return new MostUsefulConfiguration()
            .useStoryReporterBuilder(new StoryReporterBuilder()
                    .withDefaultFormats()
                    .withFormats(CONSOLE, HTML, TXT)
                    .withCodeLocation(
                            CodeLocations.codeLocationFromPath("build/jbehave")));
  }
}
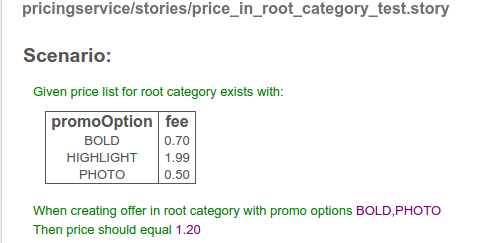
Here’s the first test for Pricing Service. It consists of three simple steps labeled by keywords Given/When/Then.
We will show later how JBehave knows which code should be invoked for these human-readable sentences.
price_in_root_category_test.story
Given price list for root category exists with:
| promoOption |   fee |
| BOLD        |  0.70 |
| HIGHLIGHT   |  1.99 |
| PHOTO       |  0.50 |
When creating an offer in the root category with promo options BOLD,PHOTO
Then the price should be equal to 1.20
JBehave will look for a Java file corresponding to the story file named PriceInRootCategoryTest.java. It must be located
in the same directory. So our directory structure looks like this:
└── src
    ├── main
    │   └── java
    │       └── pricingservice
   ...
    └── test
        └── java
            └── pricingservice
                ├── AcceptanceTest.java
               ...
                └── stories
                    ├── PriceInRootCategoryTest.java
                    └── price_in_root_category_test.story
Test file PriceInRootCategoryTest.java extends our AcceptanceTest class and contains the rest of configuration,
specific for each test, e.g. how to create classes with steps.
PriceInRootCategoryTest.java
public class PriceInRootCategoryTest extends AcceptanceTest {

  @Override
  public InjectableStepsFactory stepsFactory() {
    PricingApiClient pricingApiClient = new PricingApiClient();
    PriceCalculationReference priceCalculationRef = new PriceCalculationReference();
    PricingApi pricingApi = pricingApiClient.getPricingApi();
    return new InstanceStepsFactory(configuration(),
            new PriceInRootCategorySteps(pricingApi, priceCalculationRef),
            new PriceAssertionSteps(pricingApi, priceCalculationRef));
  }
}
Steps are simple POJOs that contain methods marked with @Given, @When and @Then annotations, that map to
sentences from a story file.
PriceInRootCategorySteps.java
public class PriceInRootCategorySteps {

  private static final int ROOT_CATEGORY = 0;

  private PricingApi pricingApi;
  private PriceCalculationReference priceCalculationRef;

  public PriceInRootCategorySteps(PricingApi pricingApi,
                                  PriceCalculationReference priceCalculationRef) {
    this.pricingApi = pricingApi;
    this.priceCalculationRef = priceCalculationRef;
  }

  @Given("price list for root category exists with: $fees")
  public void priceListForRootCategoryExistsWithFees(ExamplesTable fees) {
    PriceList priceList = toPriceList(fees);
    pricingApi.addPriceList(priceList, ROOT_CATEGORY);
  }

  @When("creating offer in root category with promo options $selectedPromoOptions")
  public void creatingOfferInRootCategoryWithPromoOptions(
          List<PromoOption> selectedPromoOptions) {
    PriceCalculation priceCalculation = pricingApi.calculatePrice(
            ImmutableSet.copyOf(selectedPromoOptions),
            ImmutableSet.of(ROOT_CATEGORY));
    this.priceCalculationRef
            .setCalculationId(priceCalculation.getCalculationId());
  }

  private PriceList toPriceList(ExamplesTable fees) {
    Map<PromoOption, BigDecimal> feesForPromoOptions = fees.getRows().stream()
            .collect(toMap(
                    row -> PromoOption.valueOf(row.get("promoOption")),
                    row -> new BigDecimal(row.get("fee"))
            ));
    return new PriceList(feesForPromoOptions);
  }
}
It often happens that some steps are common for several tests. In this case we could move common steps to a
separate class and configure the test to use several steps classes, like we did in PriceInRootCategoryTest.
PriceAssertionSteps.java
public class PriceAssertionSteps {

  private PricingApi pricingApi;
  private PriceCalculationReference priceCalculationReference;

  public PriceAssertionSteps(PricingApi pricingApi,
                             PriceCalculationReference priceCalculationReference) {
    this.pricingApi = pricingApi;
    this.priceCalculationReference = priceCalculationReference;
  }

  @Then("price should equal $expPrice")
  public void priceShouldEqual(BigDecimal expPrice) {
    PriceCalculation priceCalculation = pricingApi
            .getPriceCalculation(priceCalculationReference.getCalculationId());
    assertThat(priceCalculation.getPrice()).isEqualTo(expPrice);
  }
}
It’s worth notice that in PriceInRootCategoryTest.java we control how step classes are created and we can pass to them
some dependencies. This is a big advantage of using
ConfigurableEmbedder
to configure JBehave. When we use provided JUnit runner @RunWith(AnnotatedEmbedderRunner.class) and declare steps in
@UsingSteps(instances = {TraderSteps.class}) annotation, only default constructor can be called. In real life this
could be done by one of IoC containers like Spring, which JBehave also
supports.
Now we can run PriceInRootCategoryTest.java in an IDE just like any other JUnit test and see how it passes. We also
want to configure our build tool to run acceptance tests and to be able to run them on CI
(Continuous Integration)
server. At Allegro we use Gradle. Unfortunately JBehave documentation doesn’t say anything about
using it with Gradle. There is also no plugin like
jbehave-maven-plugin. But fortunately, it requires only a small
amount of magic code.
build.gradle
apply plugin: 'java'

sourceCompatibility = 1.8
version = '1.0'

repositories {
  mavenCentral()
}

dependencies {
  compile 'com.google.guava:guava:18.0'
  testCompile 'junit:junit:4.11'
  testCompile 'org.assertj:assertj-core:1.7.0'
  testCompile 'org.jbehave:jbehave-core:3.9.5'
  testCompile 'org.jbehave.site:jbehave-site-resources:3.1.1:@zip'
}

sourceSets.test.resources.srcDir 'src/test/java'

test {
  doFirst {
    copy {
      from(zipTree(jarPath("jbehave-core"))) {
        include "style/*"
      }
      into("build/jbehave/view")

    }
    copy {
      from(zipTree(jarPath("jbehave-site-resources"))) {
        include "js/**/*"
        include "style/**/*"
        include "images/*"
      }
      into("build/jbehave/view")
    }
  }
}

def jarPath(String jarName) {
  configurations.testCompile.find({ it.name.startsWith(jarName) }).absolutePath
}

task wrapper(type: Wrapper) {
  gradleVersion = '2.2.1'
}
We need to add src/test/java with our story file to test resources because Gradle filters out non-java files. We also
must manually copy web resources into the build dir. Our acceptance tests are regular JUnit classes, only
wrapped by JBehave extensions, so they are run always when we run ./gradlew test.
Now we can see pretty HTML output from the tests in build/jbehave/view/reports.html.
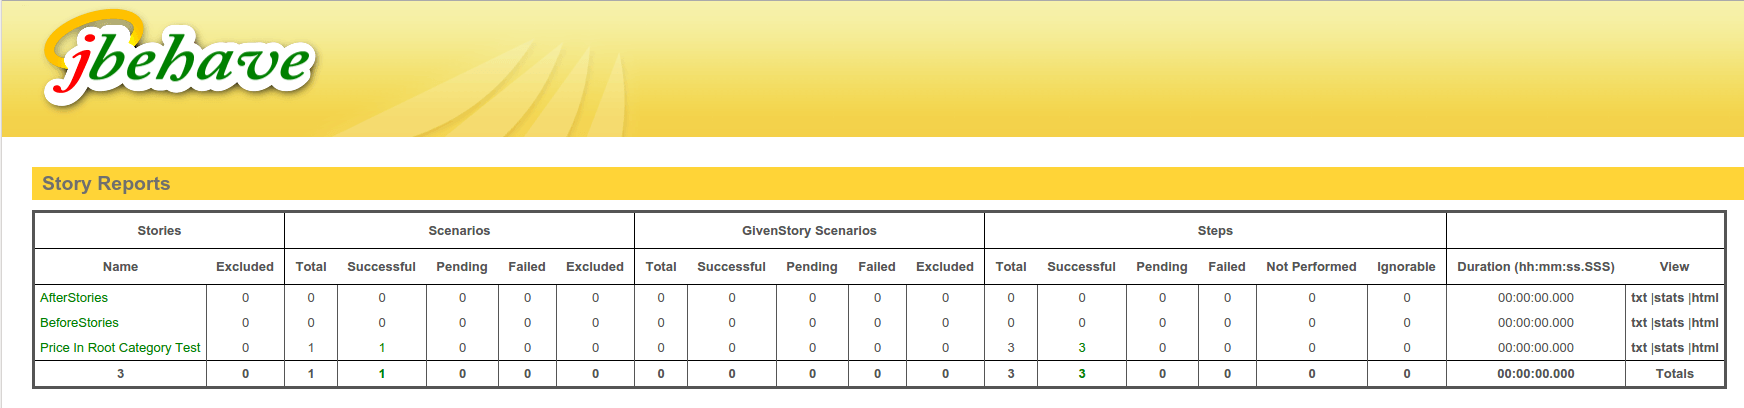
We can click on the test name to see its details.
Custom input parameters #
The true strength of JBehave is the ability to provide input parameters in a form we like and understand. Sometimes one image is worth a thousand words. Of course JBehave can’t parse images and magically extract input parameters, but we can write them using ASCII characters in any way we want and then parse them. Let’s say we want to test a feature:
Price list in sub category will override values from default price list.
Typically we write this as descriptive sentences but let’s see this in graphical form:
price_list_tree_test.story
Narrative:
In order to increase number of offers
As a price list administrator
I want to lower the price for some promo options in specific categories

Lifecycle:
Before:
Given no price lists are defined

Scenario: Price in category with redefined price list

Given price list configuration exists:

# 0: BOLD: 0.70, HIGHLIGHT: 1.00, PHOTO: 0.50
|
|----# 1: BOLD: 0.60, PHOTO: 0.40
|    |
|    |----# 2: BOLD: 0.40, PHOTO: 0.30
|
|----# 3: PHOTO: 0.40

When creating offer in category 0,1,2 with promo options BOLD,PHOTO,HIGHLIGHT
Then price should equal 1.70

When creating offer in category 0,3 with promo options BOLD,PHOTO
Then price should equal 1.10

Scenario: Price in category without explicitly defined price list

Given price list configuration exists:

# 0: BOLD: 0.70, HIGHLIGHT: 1.00, PHOTO: 0.50
|
|----# 1: BOLD: 0.60, PHOTO: 0.40
|    |
|    |---- 2

When creating offer in category 0,1,2 with promo options BOLD,PHOTO,HIGHLIGHT
Then price should equal 2.00
It’s much better to visualize the price list state in a tree form than to explain it with words. The steps class looks like this:
PriceListTreeSteps.java
public class PriceListTreeSteps {

  private PricingApi pricingApi;
  private PriceCalculationReference priceCalculationReference;
  private PriceListParser priceListParser;

  public PriceListTreeSteps(PricingApi pricingApi,
                            PriceCalculationReference priceCalculationReference) {
    this.priceCalculationReference = priceCalculationReference;
    this.pricingApi = pricingApi;
    priceListParser = new PriceListParser();
  }

  @Given("no price lists are defined")
  public void noPriceListsAreDefined() {
    pricingApi.removeAllPriceLists();
  }

  @Given("price list configuration exists: $priceListTree")
  public void priceListConfigurationExists(String priceListTree) throws Exception {
    Map<Integer, PriceList> priceListsInCategories =
            priceListParser.parse(priceListTree);
    priceListsInCategories.entrySet().stream()
            .forEach(priceListInCategory -> {
              int category = priceListInCategory.getKey();
              PriceList priceList = priceListInCategory.getValue();
              pricingApi.addPriceList(priceList, category);
            });
  }

  @When("creating offer in category $categoryPath with promo options $promoOptions")
  public void creatingOfferInCategoryWithPromoOptions(
          List<Integer> categoryPath, List<PromoOption> promoOptions) {
    PriceCalculation priceCalculation = pricingApi.calculatePrice(
            ImmutableSet.copyOf(promoOptions),
            ImmutableSet.copyOf(categoryPath));
    this.priceCalculationReference.setCalculationId(priceCalculation
            .getCalculationId());
  }
}
Of course JBehave knows nothing about our domain and we need to provide a class to parse the price list in text form to our data structure.
In the test above we also see something new. We can embed a user story using Narrative keyword. There are also two
scenarios, each with its own description. Each scenario is preceded by steps from Before keyword, in this case
removing price lists added by the previous test.
Meta filtering #
Another very useful feature is meta filtering. Using it we can separate stable regression tests that are run on CI server during each build from tests written for stories being currently implemented. Current stories are not finished, so their tests fail. We want to keep CI green, so we can add tags regression and story 123, story 456 and run only the tests with regression tag.
price_in_root_category_test.story
Meta:
@regression

Given ...
price_list_tree_test.story
Meta:
@story 42

Narrative: ...
AcceptanceTest.java
...
  public AcceptanceTest() {
    Embedder embedder = configuredEmbedder();
    embedder.useMetaFilters(getMetaFilters());
    embedder.embedderControls().doVerboseFailures(true)
            .useStoryTimeoutInSecs(60);
  }

  private List<String> getMetaFilters() {
    String metaFiltersProperty = System.getProperty("metaFilters", "");
    return Arrays.stream(metaFiltersProperty.split(","))
            .map(String::trim)
            .collect(toList());
  }
...
build.gradle
...
test {
  systemProperty "metaFilters", System.getProperty("metaFilters", "")
...
Now we can run only specified tests adding meta filter to Gradle command
./gradlew test -DmetaFilters="+regression, -story *"
+ before a tag instructs JBehave to include all stories with this tag and - does opposite. There is also
an asterisk after story tag. It is there because JBehave requires a value pattern for tags with values. When no value
is given, JBehave will not use it for filtering. The value pattern could be an exact value or *.
Conclusion #
In this post I’ve presented the core features of JBehave and explained how to use them based on a simplified implementation of a pricing service. I hope I’ve convinced you that it greatly improves readability of acceptance tests. JBehave will be ideal when you want to have clean test specifications and basic reporting, but without losing the speed of pure JUnit. Of course in real life code that interacts with an application will be more complex. Typically, it will connect to an application instance deployed on test environment and then call its API or use a graphical interface. To make life easier, JBehave provides some more advanced features. You can check them on the project website. I encourage you to give this tool a try. If you need more examples, you can also check examples on project’s GitHub page. Full source code of the example app presented in this article is available at GitHub.