
Self-contained UI tests for iOS applications
We’re all familiar with TDD, or at least write unit tests for our software, but unit tests won’t check application state after complex UI interactions. If you want to make sure that an application behaves correctly when users interact with it, then you need to write UI tests.
Automated UI tests of your mobile application can help you detect problems with your code during everyday Continuous Integration (CI) process. It may however be hard to achieve a stable test environment if your application presents data obtained from remote servers.
This article explains how to set up a self-contained test environment for connected iOS applications, that can be used both in Continuous Integration and manual testing.
We’ll be using WireMock and Xcode UI Testing with Page Object Pattern to achieve our goal.
UI Tests #
We’ll use Xcode UI Testing for UI tests. It’s the official UI testing framework from Apple that reduces the need for explicit waits in test code. Less explicit waiting means faster and more readable test code which is very important for test suite maintenance. Also, as it’s the official Apple framework, we’ll hopefully avoid situations when the test framework breaks with new Xcode releases.
Unfortunately there isn’t much official documentation for the framework, but Joe Masilotti did a tremendous job of documenting and explaining all of the quirks.
Test target setup #
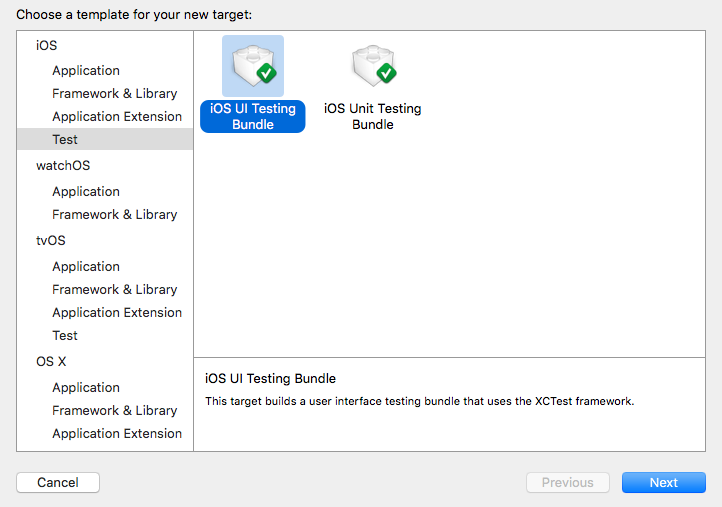
First of all we need a test target. We’ll add a new UI Testing bundle to our project:
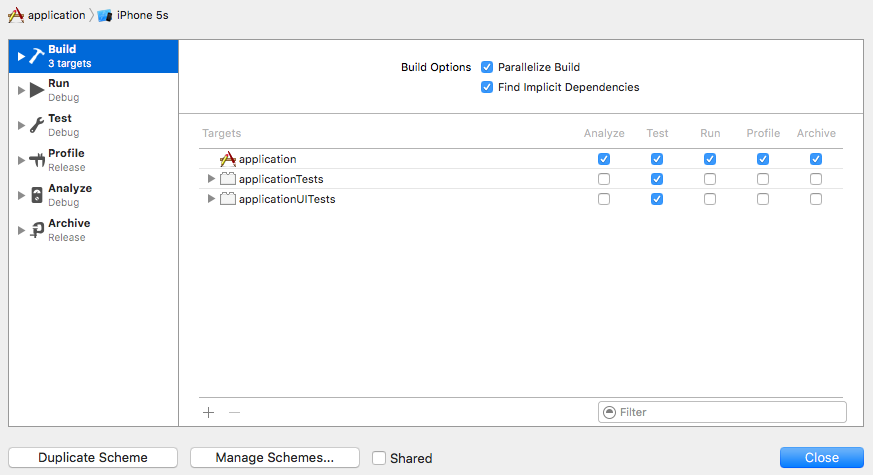
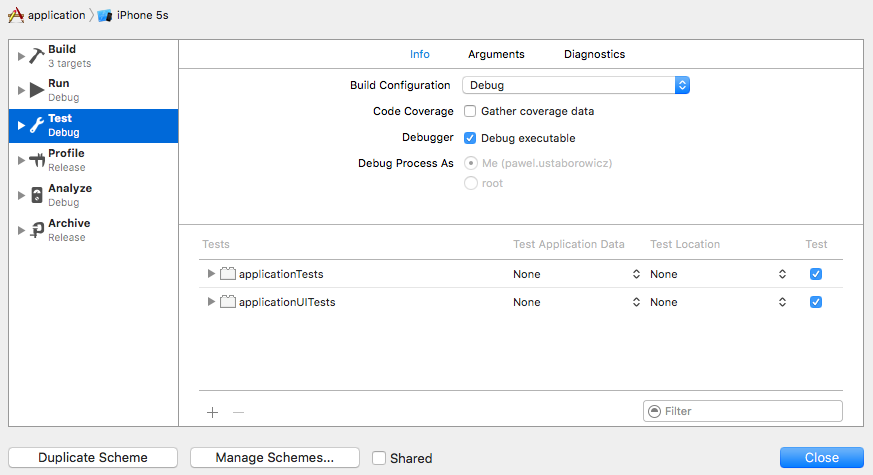
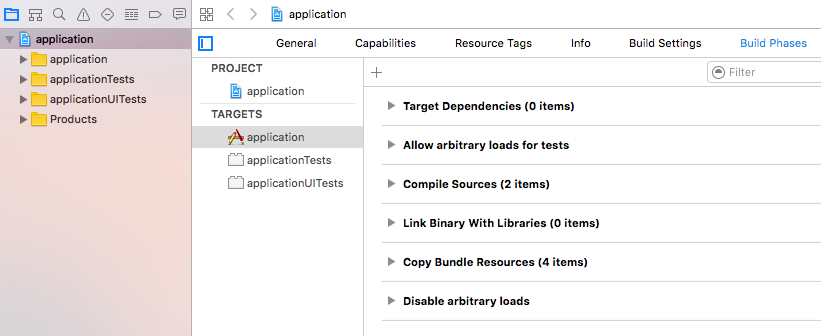
We want to run UI tests as part of CI and also allow developers to immediately see if their code changes are passing UI tests when they run tests manually. Thus we will not create a separate scheme for UI tests, but we’ll build and execute them as a part of Test action for our default scheme.
To do this we have to set up our project as on the screens below:
Disabling animations #
UI tests usually take a lot of time compared to simple unit tests. We want to make our tests as fast as possible as we’ll be running them as part of CI. We’ll disable UI animations in the application when UI tests are running to speed things up.
This can be done by setting an environment property, which we will later check at application start.
The best way to do this is to extend XCUIApplication class as it has to be done before every test:
extension XCUIApplication {
    func setUpAndLaunch() {
        launchEnvironment = ["DISABLE_ANIMATIONS": "1"]
        launch()
    }
}
Now we can call the new method in the test class setUp() instead of the regular XCUIApplication().launch():
class applicationUITests: XCTestCase {
    override func setUp() {
        super.setUp()
        continueAfterFailure = false
        XCUIApplication().setUpAndLaunch()
    }
}
The last thing we need is to check the property at application start and disable animations if needed.
This can be done in AppDelegate:
@UIApplicationMain
class AppDelegate: UIResponder, UIApplicationDelegate {
    func application(_ application: UIApplication, didFinishLaunchingWithOptions launchOptions: [UIApplicationLaunchOptionsKey: Any]?) -> Bool {
        if ProcessInfo.processInfo.environment["DISABLE_ANIMATIONS"] == "1" {
            UIView.setAnimationsEnabled(false)
        }
        return true
    }
}
Page objects #
It’s time to start writing our test code!
Let’s assume we’re testing an e-commerce application such as Allegro. It displays a listing of tappable products and we want to check if correct product is opened after a tap.
We could write something like this:
func testTapOnListingItemShouldOpenCorrectProduct() {
    // tap on first item
    XCUIApplication().collectionViews.cells["listingItem0"].tap()
    // check item title
    XCTAssertEqual(XCUIApplication().staticTexts["productTitle"], "Product 1")
    // check item price
    XCTAssertEqual(XCUIApplication().staticTexts["productPrice"], "€ 1.00")
}
But even with comments it’s not really readable, is it? Moreover we can’t reuse this code in other test methods
and copying those XCUIApplication() calls over and over again is not feasible at all.
This is the place where Page Objects (a concept known well to anyone who ever worked with Selenium) are really helpful.
We have two screens within our application:
- listing
- product
so we’ll create two screen objects that we’ll use in tests.
Let’s start with a simple listing object:
class ListingScreen {
    static func item(_ itemNumber: UInt) -> XCUIElement {
        return XCUIApplication().collectionViews.cells["listingItem" + String(itemNumber)]
    }
}
It not only wraps listing functionality nicely, but it’s also reusable for any listing item.
Product screen will look like this:
class ProductScreen {
    static let title = XCUIApplication().staticTexts["productTitle"]
    static let price = XCUIApplication().staticTexts["productPrice"]
}
Now we can use both screen objects in test code:
func testTapOnListingItemShouldOpenCorrectProduct() {
    // tap on first item
    ListingScreen.item(0).tap()
    // check item title
    XCTAssertEqual(ProductScreen.title.label, "Product 1")
    // check item price
    XCTAssertEqual(ProductScreen.price.label, "€ 1.00")
}
Code looks definitely better, but we can improve it even further…
Assert helpers #
Those assertions in the test code aren’t really reusable, but we can expect to use them a lot in test methods. Let’s try to move them to separate helper methods then:
// MARK: Helper functions
func checkProductTitle(_ title: String) {
    XCTAssertEqual(ProductScreen.title.label, title)
}

func checkProductPrice(_ price: String) {
    XCTAssertEqual(ProductScreen.price.label, price)
}
Our test method will now look like this:
func testTapOnListingItemShouldOpenCorrectProduct() {
    ListingScreen.item(0).tap()
    checkProductTitle("Product 1")
    checkProductPrice("€ 1.00")
}
It doesn’t need comments anymore, does it?
But if we run the test, we’ll discover a nasty side-effect of our helper methods:

Error marker is placed within the helper method when the test fails. This is not a big problem when the helper is used only once, but we’ll be using it multiple times in test methods.
Thankfully this is easy to fix. Every assertion method takes two additional parameters which tell Xcode from where in the source file the assert comes. We’ll use those parameters to place the error marker in the test method.
Let’s improve our helpers:
func checkProductTitle(_ title: String, file: StaticString = #file, line: UInt = #line) {
    XCTAssertEqual(ProductScreen.title.label, title, file: file, line: line)
}

func checkProductPrice(_ price: String, file: StaticString = #file, line: UInt = #line) {
    XCTAssertEqual(ProductScreen.price.label, price, file: file, line: line)
}
We can see that the marker is correctly placed when we run the test again. We didn’t even have to change anything in our test method!

Network data stubbing #
So far we were using hardcoded test data in the test method, but the truth is that our application presents data received from backend servers. Thus it’s possible that this data will often change. If suddenly a different product is the first one on the product listing then the test will fail as the name or price won’t match. Moreover a server outage will cause our tests to fail as well because we won’t receive any data at all.
How can we ensure that our tests will be server data independent and that they won’t fail if the server is experiencing downtime? Network data stubbing can help us with that.
There’s a great, well documented, opensource project called WireMock that we can use to serve network stubs. It not only serves but also records stubs, which is really handy if you want to mock network communication quickly.
WireMock script #
We want to run WireMock before every test run and also have the possibility to use it for manual tests and network communication recording. It would be hard to remember the whole syntax of WireMock commands so let’s write a simple script that would do all those things for us:
#!/bin/sh

WIREMOCK_DIR=`dirname $0`
MAPPINGS_DIR="$WIREMOCK_DIR"
PORT=8080
START=true
STOP=false
RECORD=false
API_URL="https://our.api.url"

function usage
{
    echo "Usage:"
    echo "\twiremock.sh -k|r [-h] [-m <mappings_dir>]"
    echo
    echo "\t-k --kill - stop server"
    echo "\t-m --mappings <mappings_dir> - start server with mocks from <mappings_dir>"
    echo "\t-r --record - start wiremock in recording mode"
    echo "\t-h --help - this screen"
}

while [ -n "$1" ]
do
    case $1 in
        -m | --mappings )
            shift
            MAPPINGS_DIR="$1"
            ;;
        -k | --kill )
            START=false
            STOP=true
            RECORD=false
            ;;
        -r | --record )
            START=false
            STOP=true
            RECORD=false
            ;;
        -h | --help )
            usage
            exit
            ;;
        * )
            usage
            exit 1
    esac
    shift
done

if [ "$START" == true ]
then
    echo "Starting Wiremock in play mode on port $PORT with mappings from $MAPPINGS_DIR"
    java -jar $WIREMOCK_DIR/wiremock.jar --verbose --port $PORT --root-dir $MAPPINGS_DIR &
elif [ "$STOP" == true ]
then
    echo "Stopping Wiremock on localhost:$PORT & $AUTH_PORT"
    curl -X POST --data '' "http://localhost:$PORT/__admin/shutdown"
elif [ "$RECORD" == true ]
then
    echo "Starting Wiremock in record mode on port $PORT"
    echo "Storing mappings to $MAPPINGS_DIR"
    java -jar $WIREMOCK_DIR/wiremock.jar --proxy-all "$API_URL" --record-mappings --verbose --port $PORT --root-dir $MAPPINGS_DIR &
fi
Now we’ll be able to start WireMock by simply running ./wiremock.sh and stop it by running ./wiremock.sh -k.
We can even run WireMock in record mode to record new mappings with ./wiremock.sh -r.
The script expects to find mappings and __files directories with mock files in the script directory — this can
be changed by providing -m path_to_mappings option.
Build configuration #
Now that we have our script, it would be good to start WireMock before every test session and stop it afterwards. We can achieve this by adding pre- and post-actions for Test action that will run the script with correct parameters.
Assuming that wiremock.sh is made executable and placed in WireMock directory under applicationUITests our actions
would look like this:
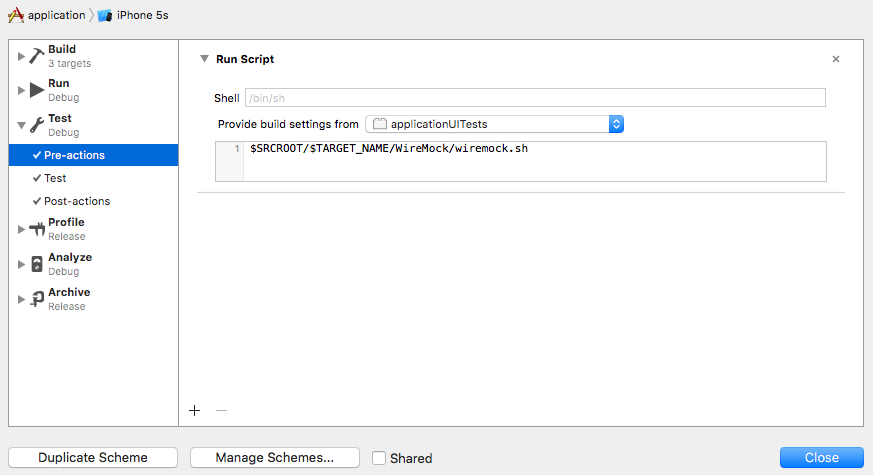
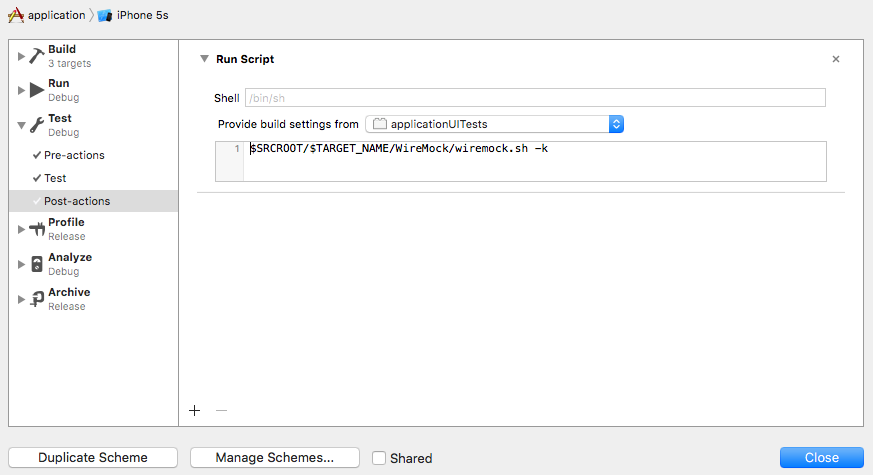
So now we start WireMock before every test session, but… our application is not using it. We have to configure the project and make a small change in application code so that it connects to localhost when needed.
Let’s start with project configuration.
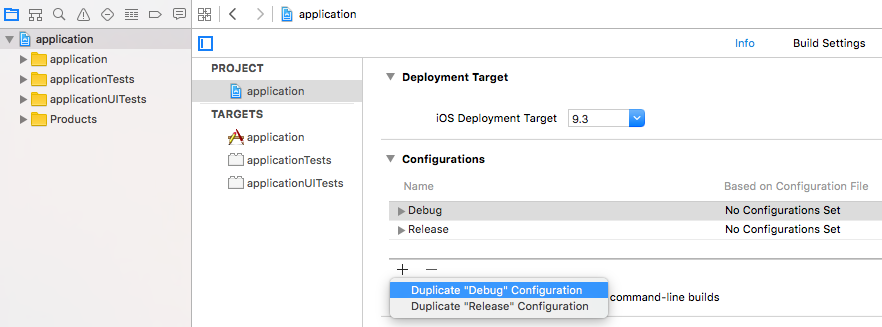
We want our Test action to use localhost and we also want to use localhost for manual testing when needed. The easiest solution that fullfils both requirements is to create a new build configuration that will set a special build flag at compilation time.
To achieve this we have to clone the Debug configuration (as this is the configuration used by Test) on project Info screen and give the new configuration a meaningful name (e.g. Localhost).
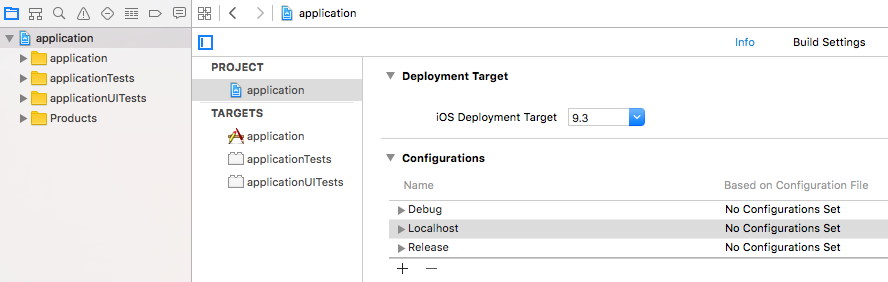
Build configurations should look like this afterwards:
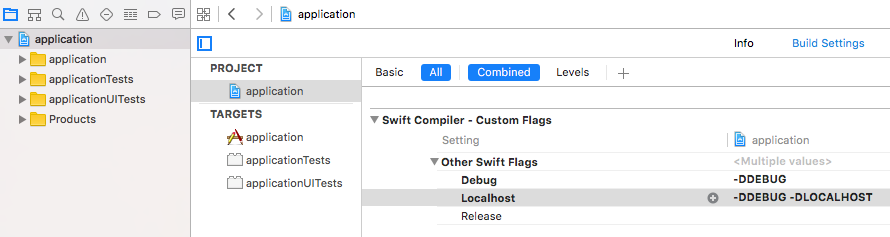
Now we have to add a new custom flag (-DLOCALHOST) for Swift compiler on Build Settings screen like this:
It’s time to make sure localhost is used instead of real API URL in Localhost configuration. We have to add conditional code in the place where API URL is defined:
var baseURL: String {
#if LOCALHOST
    return "http://localhost:8080"
#else
    return "https://our.really.great.api"
#endif
}
We’ll be sending requests to WireMock over an unencrypted connection so we need to allow arbitrary loads in Info.plist. We only want to do this for Localhost configuration and no other so we’ll add two additional build phases to the application target.
First one will run before actual compilation takes place and will enable arbitrary loads for Localhost:
if [ "$CONFIGURATION" == "Localhost" ]
then
    `/usr/libexec/PlistBuddy -c "Set :NSAppTransportSecurity:NSAllowsArbitraryLoads true" "$SRCROOT/$INFOPLIST_FILE"`
fi
Second one will run after compilation and will disable arbitrary loads:
if [ "$CONFIGURATION" == "Localhost" ]
then
   `/usr/libexec/PlistBuddy -c "Set :NSAppTransportSecurity:NSAllowsArbitraryLoads false" "$SRCROOT/$INFOPLIST_FILE"`
fi
Build phases should be ordered like this:
Using data from mocks in tests #
So far our test methods included hardcoded data like “Product 1” for item name. This isn’t really flexible because we would need to change those hardcoded values every time we make a change in mocks. It would be way better if we used the data loaded from mocks. We can do this by creating a simple mock data parser for tests.
But first things first — let’s bundle mocks with the test bundle so we have files to read from.
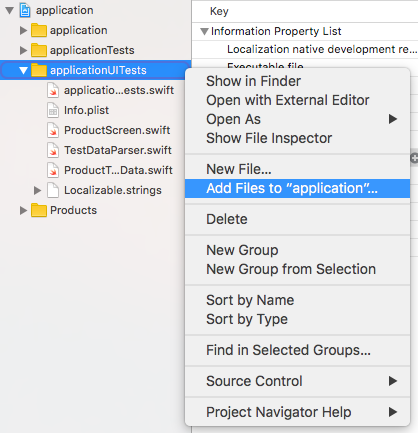
The easiest way to do it is to reference __files directory in the UI test target like this:
Afterwards we’ll have a reference to the __files directory in our project structure:
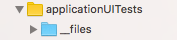
This way we can easily access mock files in Xcode and they will be automatically bundled with test bundle.
We are ready to write our parser code now.
Let’s start with a simple base class for test data parsers that will load a specified mock file and deserialize it
into a dictionary at initialisation time.
We’ll also create a simple type alias called JSONDict for readability purposes as it’s easier to use in code than
[String: AnyObject]
typealias JSONDict = [String: AnyObject]

enum TestFile: String {
    case firstProduct = "body-firstproduct"
}

class TestDataParser {
    var json: JSONDict!

    init(testFile: TestFile) {
        guard let path = Bundle(for: type(of: self)).path(forResource: testFile.rawValue, ofType: "json", inDirectory: "__files"),
            let jsonData = try? Data(contentsOf: URL(fileURLWithPath: path)) else { return }

        do {
            json = try JSONSerialization.jsonObject(with: jsonData, options: JSONSerialization.ReadingOptions.mutableContainers) as? JSONDict
        } catch let jsonError {
            print(jsonError)
        }
    }
}
Now, when the base class is ready, we can create a proper parser for product mocks.
Let’s assume we have a mock for a product request that looks like this:
{
    "product": {
        "title": "Product 1",
        "price": "1.00",
    }
}
Data parser for product file can be implemented like this:
class ProductTestData: TestDataParser {

    var title: String {
        return product["title"] as! String
    }

    var price: String {
        return "€ " + (product["price"] as! String)
    }

    private var product: JSONDict {
        return json["product"] as! JSONDict
    }
}
Now, if testData is an instance of ProductTestData, we can call testData.title to get product title from loaded
mock.
Let’s modify our tests to use the new test data parser:
class applicationUITests: XCTestCase {

    let testData = ProductTestData(testFile: .firstProduct)

    override func setUp() {
        super.setUp()
        continueAfterFailure = false
        XCUIApplication().setUpAndLaunch()
    }

    override func tearDown() {
        super.tearDown()
    }

    func testTapOnListingItemShouldOpenCorrectProduct() {
        ListingScreen.item(0).tap()
        checkProductTitle(testData.title)
        checkProductPrice(testData.price)
    }

    // MARK: Helper functions
    func checkProductTitle(_ title: String, file: StaticString = #file, line: UInt = #line) {
        XCTAssertEqual(ProductScreen.title.label, title)
    }

    func checkProductPrice(_ price: String, file: StaticString = #file, line: UInt = #line) {
        XCTAssertEqual(ProductScreen.price.label, price, file: file, line: line)
    }
}
That’s it!
We now have a readable test that uses data received from WireMock. The test environment is ready and we can write more tests in similar manner.
Summary #
At first glance it might seem that it’s not easy to set up a UI test environment for iOS applications, but as you’ve seen above it just takes a few simple steps.
It’s most definitely worth the effort as it can save you lots of manual testing and it will show you issues with your code as soon as that code is committed.