
Starting a New Service: From Naming to Structuring the Project
This post describes how our team at Allegro started building a new service. We’ll go through the process step by step: first ensuring we have a clear understanding of the business process to implement, then choosing the service name, and finally setting up the project structure. By the end, you’ll see how to create a solid application skeleton that makes developing subsequent features straightforward and efficient.
Understanding the process #
Thanks to the EventStorming technique, we mapped the entire business process. This allowed the whole team to gain a shared understanding of what needed to be implemented. The sticky notes from the session were translated into concrete tasks, and we felt confident about the next steps.
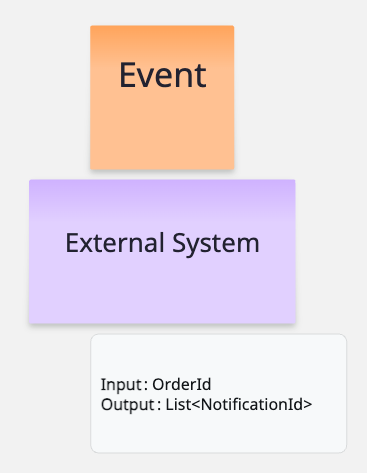
However, when a process involves multiple external service integrations, knowledge gaps or “hot spots” can appear at the integration points. Sometimes we don’t have enough data to call a service, or it’s unclear what information we need to retrieve.
We found that asking the following questions helps identify such “hot spots”:
- What data do I need to make the request (input)?
- What data do I need to return back (output)?
Answering these questions clarifies both the purpose of the integration and its technical details. Documenting this information for each integration reduces the risk of misunderstandings later during development.
Other potential risks to watch for include:
- Is the external service ready for the expected traffic?
- What is the response time?
- Is additional authorization required?
- Is the data real-time or cached?
Naming the service #
When starting discussion on a new service, it’s helpful to give it a temporary name.
Personally, I like using animal names for this, for example project-badger.
Such names work great during team discussions or grooming sessions.
They let everyone refer to the topic easily without locking us into a final name too early, giving us time to choose it later when the
responsibilities of the new service are well-defined and clear.
Choosing a wrong name too early may unintentionally affect the service’s scope or responsibilities.
When the moment comes to choose the actual name, it’s best to make this decision together with the whole team. The name of a service appears in many places — in code, documentation, and communication — which means changing it later can be difficult or even impossible. When searching for a good name, it’s worth starting by listing the service’s responsibilities and clearly defining what it does and what problem it solves. Once we understand why we are building something, we can move on to the question of how to name it. With a clear list of responsibilities, you can even ask AI to generate some name ideas. After gathering a few suggestions, it’s easy to create a poll and pick the best one.
Choosing a name based on the service’s responsibilities is, of course, only one of many approaches. Alternatively, we can use names that don’t relate to the service’s purpose at all, for example, names inspired by Pokémon characters, animals, and so on. Personally, I prefer short names consisting of no more than two words. From experience, long names, although great on paper because they describe the intention perfectly, often end up being shortened to acronyms like SPOA, PIF, PIS, etc. In such cases, it’s worth considering whether saying Psyduck wouldn’t be just as good as SPOA. Neither SPOA nor Psyduck reveal anything about what the service actually does.
Project kick-off #
After choosing a service name, the next phase includes:
- Creating repositories for the application, configuration, and monitoring
- Setting up project in the chosen technology
- Configuring the build process
- Setting up observability and monitoring
These are standard tasks for every new project. At Allegro, this process is automated and straightforward. The goal is for all environments (dev, test, prod) to be ready after the kick-off phase. A ready environment means several concrete things:
- The build works without errors, and the package can be successfully created
- The artifact can be deployed to the environment
- Logs and metrics are available
When all environments meet these conditions, new tasks can be developed and delivered with confidence, rather than only merging code into the master branch while waiting for environments to become fully prepared.
Project skeleton #
If we don’t set up an initial project structure before development starts, the structure will be defined by the first commit that gets merged into the main branch. That can quickly lead to both technical and organizational issues. When several tasks are being developed in parallel, every pull request will require extra work just to align it with whatever has already made it into main. If someone later tries to rethink or change the structure, it can spark long discussions that block development and create unnecessary chaos.
So what should a good application skeleton include?
Business structure #
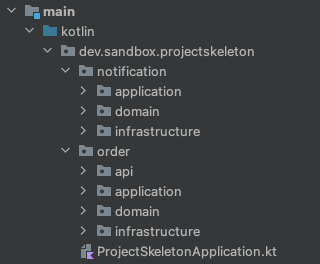
A well-structured project often reflects the domain we’re modeling. Using a domain-based structure where the code organization mirrors the business concepts and bounded contexts can be very effective. This approach makes it immediately clear which parts of the system correspond to which business areas, improving both clarity and maintainability.
Initially, it’s good to represent these concepts in the code as packages and enforce relationships between them using architectural tests (ArchUnit), which help prevent unwanted dependencies at compile time. Why packages instead of Maven or Gradle modules? Because refactoring of packages can be carried out much more quickly and easily than refactoring modules.
Throughout the project’s lifecycle, it’s worth regularly evaluating whether your current business boundaries still make sense. What worked well during the first year of development may no longer be sufficient after adding a few major features. The domain structure should evolve together with the system.
Example projects based on domain-based structure:
Technical structure #
Once the domain structure is defined, we move on to the technical structure of our modules.
A standard setup that is commonly seen in many projects consists of four main packages: api, application, domain, and infrastructure within each module.
-
apicontains REST controllers. -
applicationlayer contains application services. It coordinates domain objects from domain layer to model use cases (processes). It handles transactions if needed. Integration tests are used to verify this layer. -
domainis the core of our system. It contains aggregates, entities, value objects, events, factories, policies and ports. The Spring framework is not used here. Value objects are preferred over primitive types. Only unit tests are applied to this layer. -
infrastructurelayer handles database access and communication with external services. It implements the communication contracts defined by the domain layer (ports). This layer is tested with integration tests.
It’s not a bad structure, but I considered it to be too complex, and even with a good description, developers often struggle to apply it correctly. That’s why I prefer a simpler setup consisting of:
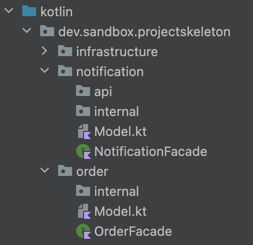
- Facade (interface) that describes capabilities of each module, named using the pattern
<ModuleName>Facade, e.g. OrderFacade. - Model file or package that contains all data classes used in the facade’s method signatures. These classes constitute the public API of each module and are accessible from other modules.
internalpackage containing the actual implementation of each module. Everything inside the internal package is considered to be private and not accessible from other modules. This rule is protected using architectural tests.apipackage is optional and only needed if the module exposes a REST API.
Infrastructure package is not included, it is moved out of each module. I wrote about this in detail in my previous post “From Complexity to Simplicity: How to Write Integrations with External Services” The mentioned structure was originally developed by the team I joined at Allegro, and I find it easy to follow, elegant, and minimalistic. It highlights what is most important for each business module, its capabilities, through a Facade interface, while hiding how it is implemented inside the internal package.
Summary #
Before coding the actual business tasks, it’s worth taking some time to prepare the project properly. Decisions like project structure will need to be made anyway. It’s better to do it before any production code exists. This prevents confusion later and makes development smoother. Starting a new service is also a chance to discuss or establish team standards.