
High performance with low-level tools
Even though a lot of software development is high-level stuff which does not require the developer to delve into the details of how things work under the hood, in certain situations it can be very helpful to know what sort of low-level operations an application is performing. Two typical scenarios are performance tuning and debugging.
Below you can find some tools which are already available or can be easily installed on most Linux and UNIX-like systems (e.g. using apt-get) and which can help you with debugging, tracing and monitoring your application’s behavior. Using some of them requires root access. Most have a number of advanced features which are not covered here.
Interpreting the numbers these tools display is often a complex task and will not be explained here. Note that if you deploy your software
to virtual machines in the cloud, as we usually do at Allegro, interpretation of results becomes even harder than
with physical machines since there is always an additional level of indirection above the machine you can directly observe. Performance
tuning is quite complex, so explaining it is not the point of this post — I assume you already know the basics. The point is rather to
draw your attention to the fact that the tools described here exist at all. I would especially like to highlight strace which
can be helpful not only in performance tuning but also in common debugging situations. If you’re interested, you can find more
information in the man pages of the tools and on the Internet.
Table of Contents #
- CPU, memory and I/O load
- System and library call tracing
- Detailed I/O tracing
- Network and file descriptors
- Hardware properties
- Multi-purpose tools
- Pseudo-filesystems
- Closing remarks
CPU, memory and I/O load #
top and htop #
Almost everyone uses top to display processes’ CPU usage, but this tool can do much more.
First of all, pressing h key when the application is running will display help about available shortcuts. There are a lot of
useful features including a multi-window mode. Some of the interesting and little known shortcuts are:
zto toggle color display.<and>to move the column by which entries are sorted to the left and to the right. Sorting is by CPU usage by default. Pressingxtoggles the highlighting of sort column.Msorts entries by memory usage.cto toggle display of processes’ full command line.Hto display individual threads instead of processes.
Some options can be set on the command line as well. One example of a convenient command-line option is -p which starts
top with only specified processes visible. For example, to monitor process with PID 1234, you would run top -p1234.
A program called htop is sometimes more convenient to use than regular top. It offers a text-mode UI with
color display by default and navigation shortcuts similar to Midnight Commander (mc).
It’s quite user friendly and highly customizable. It also offers a convenient process-tree view (F5 or t). The shortcut
to display threads is H just as in top. Likewise, you can use -p command-line parameter to monitor only selected
processes.
While top is available on almost any Linux machine, htop usually needs to be manually installed using apt-get or another package
manager. If you like using htop or any other non-standard tool, and use Puppet or another similar
configuration management utility, it may be convenient to add the corresponding packages to your manifests so that they are installed
automatically on any new machines you set up.
iotop #
If there’s top for monitoring CPU and memory usage, there’s also iotop for monitoring
I/O activity (to be more precise: block device activity). While tools like vmstat or iostat (mentioned below) only show
the summary of input-output activity in the whole system, iotop allows you to quickly determine which process is causing this
activity. Useful keyboard shortcuts include:
a(or-acommand-line option) toggles accumulative mode. In this mode, total I/O performed since the start of monitoring is displayed instead of current transfer rates.o(or-ocommand-line option) toggles the display of only processes which are performing I/O activity. Especially useful in combination with-a.- Left and right arrows change the column by which entries are sorted.
vmstat #
vmstat displays essential system activity statistics such as memory usage, CPU and
I/O activity, context switches, etc. Apart from the almost-obligatory refresh delay, useful command-line options include -S M
which switches memory display to use megabytes as unit and -s which dumps (just once) some interesting system statistics. With
recent kernel versions, vmstat can display a number of detailed I/O-related statistics thanks to -d and -D
options.
iostat #
iostat displays detailed statistics about the system’s I/O activity and can be very helpful
in explaining why certain activities overload the machine’s disks while other apparently similar workloads can be handled just fine.
Command-line option -m causes megabytes to be used as the basic unit while -x turns on extended display. In extended
mode, not only transfer rates are displayed but also the number of operations as well as the number of merged operations and average wait
times, which are a measure of the disk controller’s performance.
The number of I/O operations that can be handled is one of the things that set solid-state (SSD) disks apart from traditional rotational disks (HDD) and can often explain strange situations such as why a system is struggling to handle a 5 MB/s transfer. You can put a device name on the command line in order to not mess up the display with data for disks which you are not interested in.
Unintuitively, on Debian and Ubuntu, iostat does not have a separate package and is installed using apt-get as part of
the sysstat package.
System and library call tracing #
strace #
Suppose you just deployed your application to production environment but it seems to not be running and you don’t see any logs.
Such situations are more common when you send your logs from all machines to a central log server using tools such as
logstash and Kibana, but can also happen when logging to local
files. Since your logging is dead, it may be difficult to learn what is going on,
and in particular, how to get logging back to work. Or for some reason you see in Zabbix / Nagios
that your host
is generating lots of network traffic but you don’t know why it is sending so much data, what data it is and where it’s going. In such
cases, strace may come in handy.
Whenever an application needs to perform a task that uses some shared resource such as a filesystem or a network, it requests the Operating
System (OS) to handle the operation. Most such requests are handled by system calls, and strace is a tool which allows system
calls to be traced and logged. This makes it possible to directly view what data your application is sending over the network, when it
accesses the system clock or what files it opens. Note that a few operations are handled by the OS, but not through system calls. An
example would be accessing data on disk via memory-mapped files: system calls are used
to map and unmap areas of a file, but individual accesses are handled by the virtual memory
subsystem without the overhead that system calls introduce.
strace is a very powerful tool for analyzing the activity of applications, whether they be written by you or by someone else. It
can be used to start and trace a new application, or it can attach to an already-running application. For a simple use case, run
strace ls in order to execute ls under the control of strace. You will see a number of system calls printed, among
which you should be able to recognize calls such as open, write and close which handle file operations as well
as printing to standard output. To test the other mode, you can start some Java service on your machine, find its PID and run
strace -p1234 -s1000 -f -t (assuming the PID was 1234). You may be surprised at how many system calls are performed by a Java
application even when it is seemingly idle.
The command-line options of interest in the above example are:
-pfor attaching to a process with known PID (this usually requires root access even if you are the process owner),-ffor tracing forked processes (including threads),-tfor printing timestamps,-s1000for printing up to 1000 characters of the calls’ arguments.
Other useful options
include -o for saving output to a file and -e for filtering the system calls which you want to trace
(e.g. -eread,write,sendto,recvfrom,open,close is useful for debugging network traffic).
Note that by default, strace prints its output to standard error instead of standard output. This means that if you want to
search for data in the output, you need to either use -o to save it to a file first, or redirect stderr to stdout before piping
the result over to grep:
strace ls 2>&1 | grep 'write'
ltrace #
While strace traces system calls, ltrace can trace library calls. The libraries
mentioned here are of course not dependencies of your Java application, but rather system-level libraries such as the standard C library.
This tool is probably more useful for C developers than Java developers, but sometimes it can help in debugging issues or checking how
certain features are implemented (e.g. those related to synchronization or filesystem access). Command-line options and program behavior
are very similar to strace.
Detailed I/O tracing #
blktrace #
When it comes to debugging block I/O activity, blktrace provides the most detailed
information. This powerful tool can record individual disk reads, writes and seeks so you get a very detailed view of what is happening
in the system. Since block layer activity is recorded directly, even I/O operations originating from memory-mapped files or otherwise
not cause by system calls, will be recorded.
Due to the huge amount of data produced, blktrace only creates a binary log of operations, and separate tools such as
blkparse and btt are used to display
the data in a human-readable format and analyze it. Tip: never store the log on the device you are analyzing or you’ll create a positive
feedback loop.
Network and file descriptors #
netstat #
For debugging network-related issues, such as determining what clients are connected to your application or which application is blocking a port
and preventing your app from listening on it, netstat is often the tool of choice.
This application can print open network connections as well as their states. A combination of options I often use is netstat -telap. This
combination displays information about TCP connections, with extended display, for all connections, including listening sockets and shows
program PIDs. The l flag is redundant due to presence of a but makes the set of flags easier to remember.
By default, netstat tries to display host names instead of IP addresses and replaces well-known port numbers with their
corresponding protocol names, e.g. http instead of 80. Sometimes this is confusing and may make searching through the
list harder since it is not always obvious which ports are in numeric form and which are replaced with descriptive names. Resolving host
names requires DNS queries and may make netstat slow. For this situation, netstat offers the -n flag (and
several more fine-grained others) which disables all human-friendly display names and shows only numeric ports and host addresses. Quite
often, using -n makes netstat much faster.
With -s flag, netstat prints a summary of system-wide statistics related to the network stack. This information can be
used to debug issues such as connection time-outs or resets.
lsof #
lsof stands for “list open files” and it displays open files, including sockets, pipes and
device special files (this is Linux / UNIX so almost everything is a file).
It can be used for similar purposes as netstat as well as for tracing what files an application is
using. Displaying UNIX pipes can sometimes help in debugging
IPC (Inter-Process Communication) issues within a single machine.
Hardware properties #
hdparm #
hdparm can display lots of useful information about a disk drive when used with the
-i or -I flags. It can also read and set a number of advanced options, some of which are extremely dangerous.
hdparm can be used for smoke-testing your drive’s performance when run with the -Tt flags. While it is by no means a
real benchmark, it provides an approximation of the disk’s transfer rate (labelled buffered disk reads). If your new and shiny high-end
server shows a number lower than your laptop, expect something to be wrong with the system. The value cached reads can be used as an
approximation of memory and system bus speeds.
lshw, lspci and lsusb #
There are a number of lsXYZ programs for listing different kinds of resources in a system. For learning about hardware attached
to the machine, the most useful are: lshw (“list hardware”),
lspci (“list PCI devices”) and lsusb (“list USB
devices”). Some support verbosity flags which make their output more detailed, but the information is quite detailed to start with: for
example lshw can display each RAM chip individually along with information such as what slot it is inserted into on the
motherboard.
Multi-purpose tools #
sysdig #
There’s a new kid on the block, called sysdig. It offers convenient access to a number of interesting
statistics, some of which would require a bit of shell scripting in order to be extracted using more generic tools. We haven’t fully
evaluated sysdig yet, but it looks promising. Expect to find out more about it from another blog post of ours in some time.
Pseudo-filesystems #
A lot of system information can be accessed on Linux through pseudo-file systems. Theses are structures which appear to be files within the
directory structure, but do not contain files stored on disk but rather gateways to system information made available by the kernel. Most
files in these filesystems are read-only but some can be written to in order to change kernel settings. For example, some files in
/proc can be both read and written which can replace the use of sysctl.
/proc #
The proc pseudo-filesystem was designed in order to make accessing information about individual
processes more convenient, but over time more unrelated features were added. For each PID there exists a subdirectory /proc/PID
with files such as cmdline, cwd and environ which, when read, will provide, respectively, the full command
line, working directory and full set of environmental variables of the process.
Some of the files found in the tree, including cmdline, contain values separated by the
NUL character (\0). For viewing or processing with command-line tools,
it may sometimes be more convenient to convert NULs to end-of-line characters using tr '\0' '\n'.
The directory /proc/PID/fd contains files corresponding to all file descriptors opened by the process. These files appear as
symbolic links, so you can see the contents of these files as the process sees them. You can even use them to rescue a deleted file if
some process still has the file opened. In the case of sockets, the link target will look similar to: socket:[597684].
The number is the inode number in Linux’s
virtual filesystem, and you can find the same value in the outputs of
netstat and lsof, thus combining the information provided by different tools. Note that in netstat, the socket
may be filtered out e.g. if you used the -t option which displays only TCP sockets, and the socket in question is a UNIX-domain
socket.
The file /proc/PID/smaps contains very detailed information about the process’s memory layout. You can extract from it
information about memory-mapped files and how big parts of each are currently loaded into memory. A utility called
pcstat can render this information as easy-to-read text-mode histograms.
The two files /proc/cpuinfo and /proc/meminfo provide detailed information about available CPU cores and memory usage,
respectively.
The directories /proc/sys and /proc/net allow reading and tuning of many system parameters which may affect performance.
There are many very interesting things to be found in /proc which are outside the scope of this article, but they are certainly
worth a look. Do be careful, however, before trying to modify any settings. Some are really dangerous.
/sys #
One of the reasons for creating sysfs was that over time a lot of information was added to
/proc which was not related to the original purpose of providing per-process information. Apart from introducing more order,
/sys was also added as a new way of accessing per-device information. Some interesting settings you can control via /sys
include getting and setting the I/O scheduler for a drive through /sys/block/DEV/queue/scheduler and checking if the drive is
rotational (HDD) or not (SSD) by reading /sys/block/DEV/queue/rotational.
Many other performance-related parameters can be retrieved or set via /sys — actually tools such as lshw often use
/sys and /proc internally. For an interesting experiment with the tools mentioned in this post, you can use
strace to debug how lshw works internally, and search the output for uses of /proc and /sys:
strace lshw 2>&1 | egrep '/proc|/sys'
Summary #
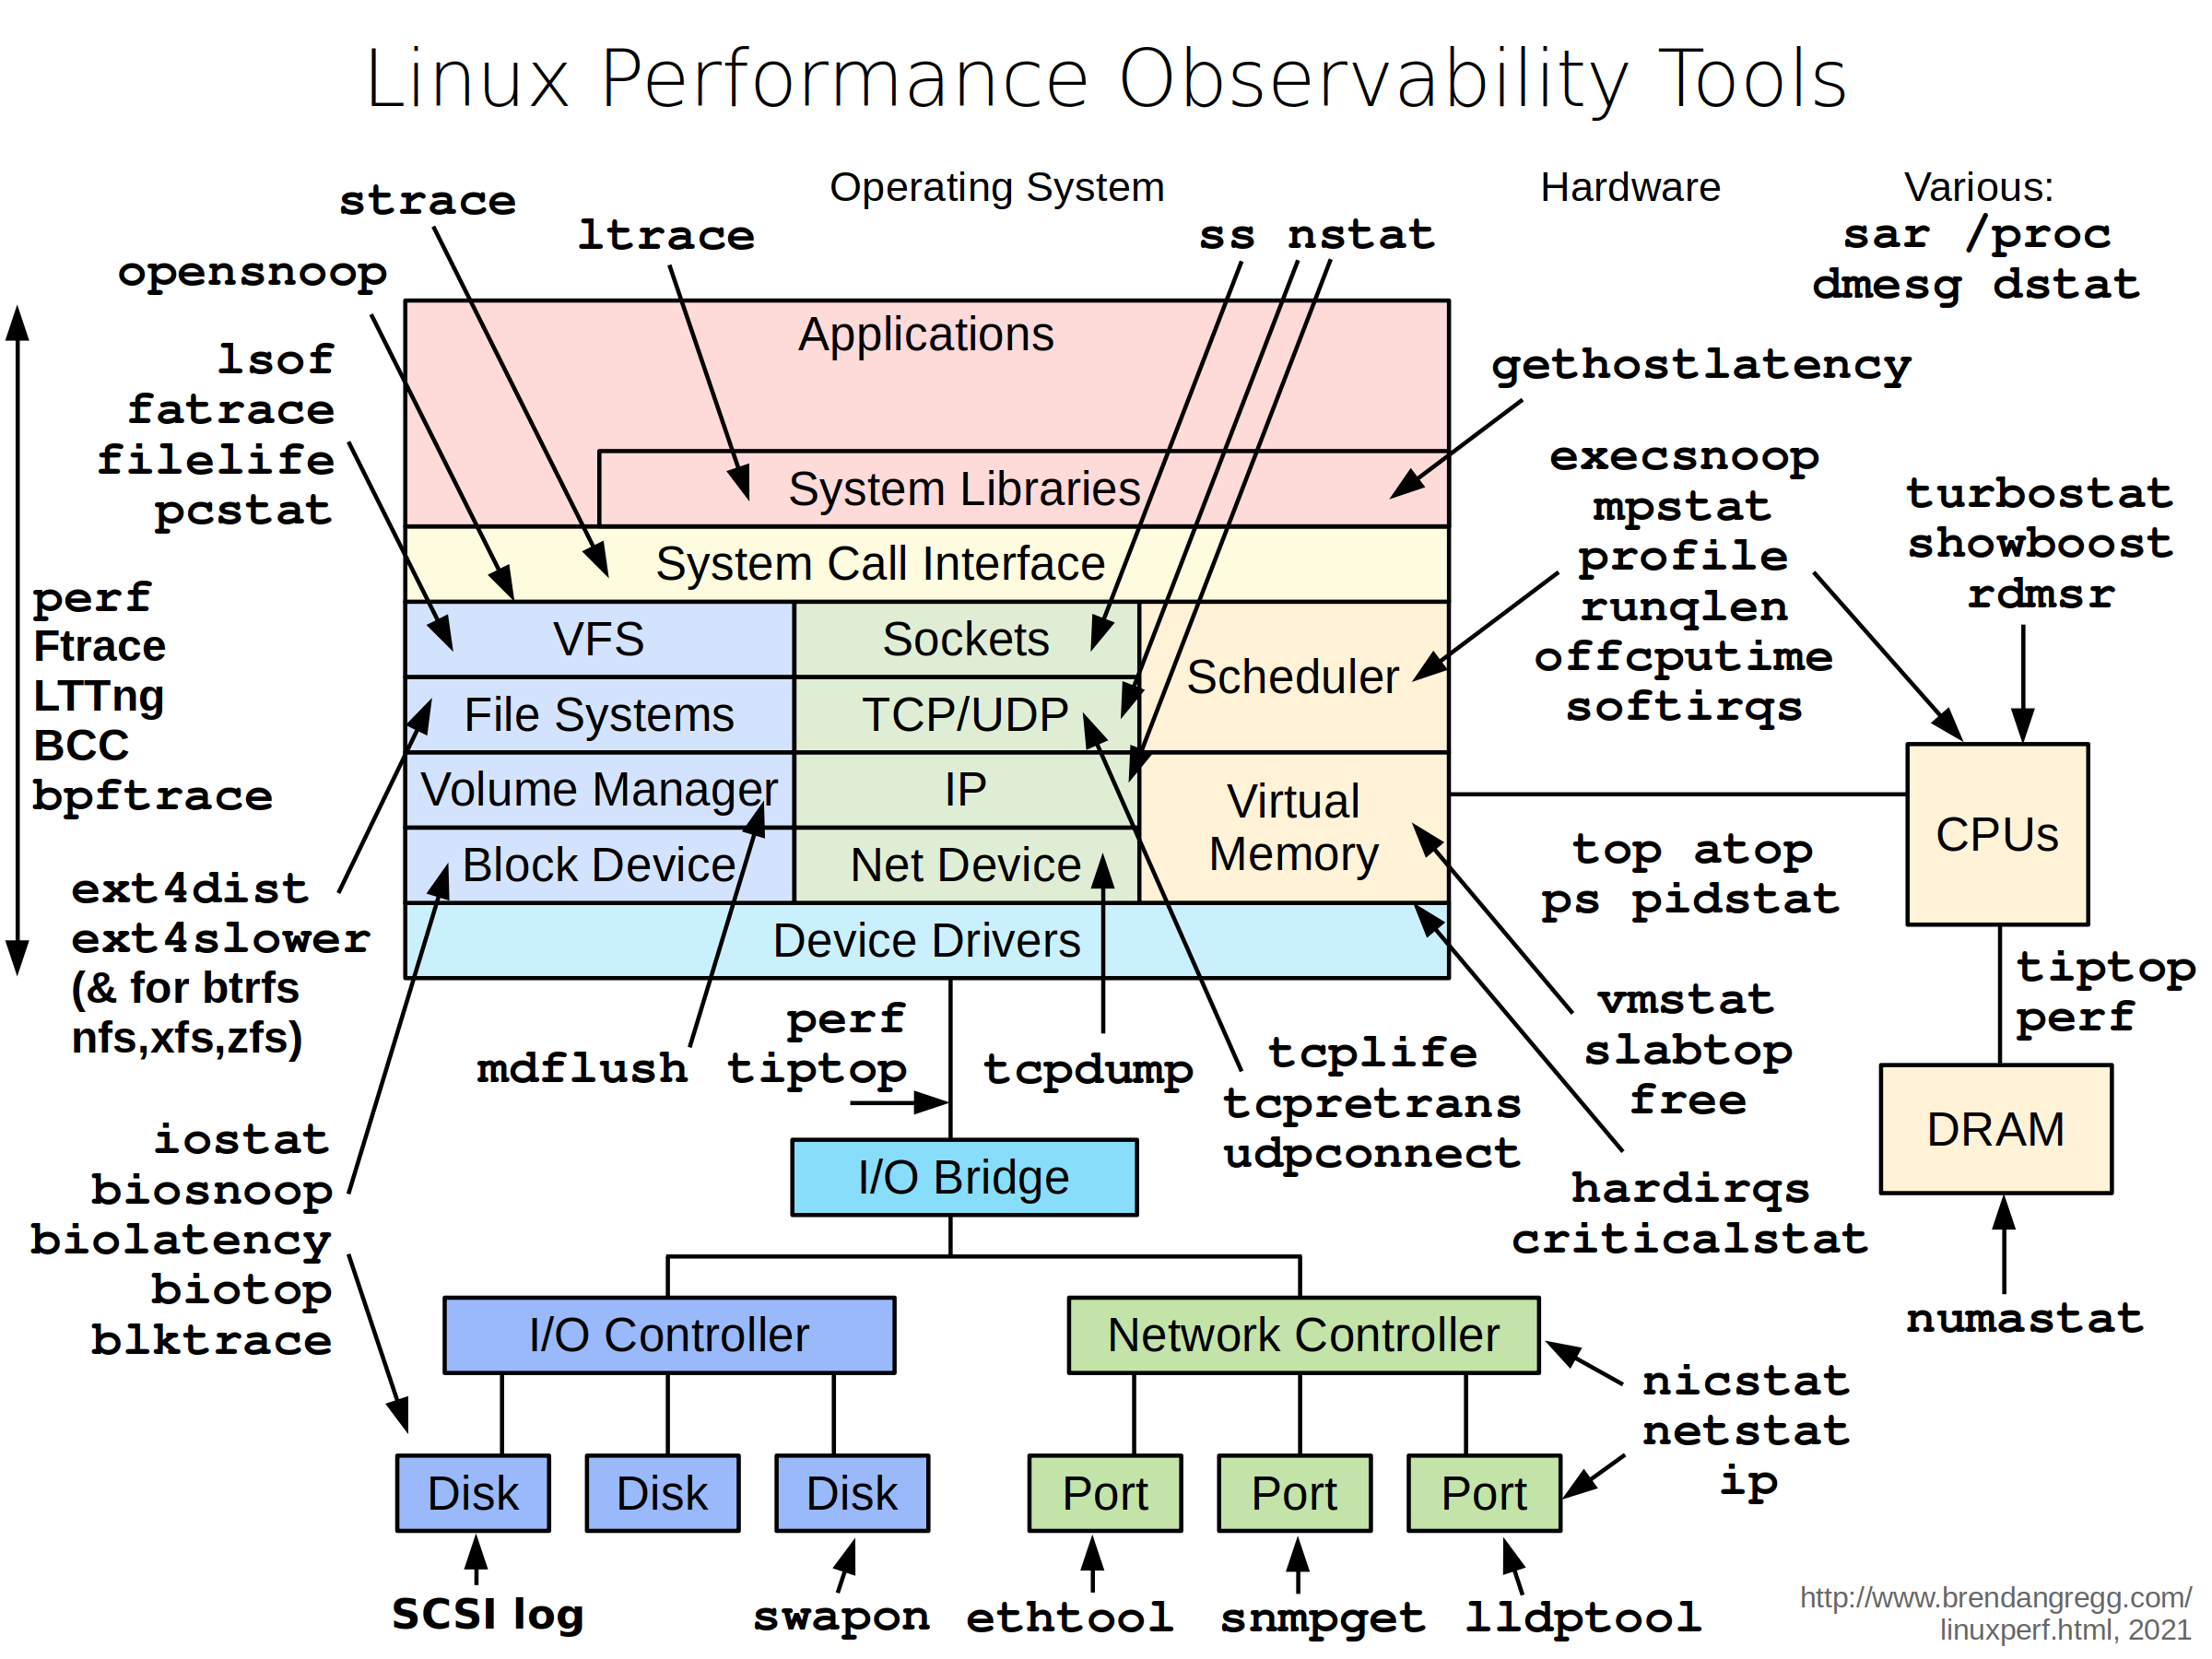
Even when writing high-level code, at some point you have to deploy and run it on some hardware or virtual machine. Knowing what is going on inside an application is crucial to making it stable, fast and predictable. Adding extra logging to your code is not always practical and sometimes simple tools can be very helpful in monitoring applications or debugging issues on a live system. You can use this nice overview to find out about many additional tools not mentioned here.
I hope you find this post interesting and a good starting point to learning more.